- Installing the B-Productiv Lite WordPress Plugin
- Configuring the B-Productiv Lite WordPress Plugin
- Adding New Users (Managers, Employees, Contractors)
- Adding New Reoccurring Alerts
- Adding New To Do’s
- Deleting B-Productiv Lite WordPress Plugin
- FAQs
Installing the B-Productiv Lite WordPress Plugin
Automatic installation
- Log in to your WordPress dashboard.
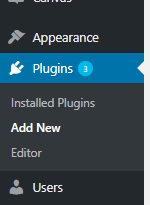
- Navigate to the “Plugins” menu on the left side of the screen.
- Click Add New.
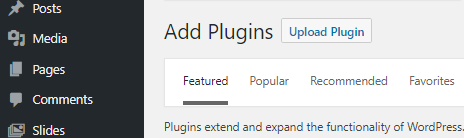
- In the search field type “B-Productiv” and click Search Plugins.
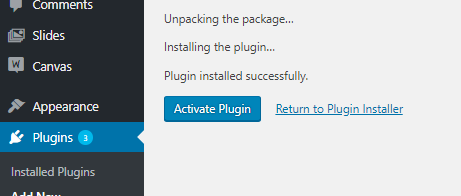
- Install it by simply clicking “Install Now”.
- Activate the plugin through the “Plugins” screen in WordPress.
Manual installation
- Download the B-productiv plugin from WordPress.org.
- Install the B-Productiv plugin through the WordPress plugins screen directly by navigating to “Plugins”
located in the list of tabs on the left side of the screen. - Click “Add New”.
- Click “Upload Plugin” and select the B-Productiv plugin file.
- Activate the plugin through the “Plugins” screen in WordPress.
Configuring the B-Productiv Lite WordPress Plugin
Use the B-Productiv screen to configure the plugin. The B-Productiv screen can be accessed
clicking “B-Productiv” in the list of tabs on the left side of the screen.
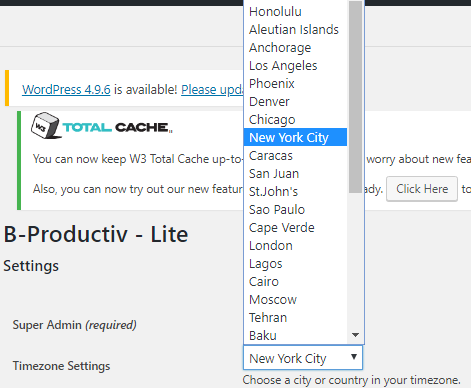
- Select a Super Admin from the drop down menu. This admin will be the only person allowed to see and change B-Productiv settings.

- Choose a city or country in your timezone.
- Select the date format for the plugin.

- Indicate whether you want data saved in the database by the B-Productiv Lite plugin to be saved when the plugin is deleted.
- Click “Save Settings” when finished.

- Use the “Link to the Portal” to proceed to the Portal.

Adding New Users
To add a new user to your B-Productiv account, go to the Dashboard of your WordPress account. Along the left side, you should see a tab labeled USERS. Under USERS, click Add New.

- Enter the username, email address, first, and last name of the User.

2. Next, choose the role of your User: Subscriber, Employee, Contributor, Contractor, Author, Editor, or Administrator. Most likely, your User will be either an Employee or a Contractor. The role of your user will determine the features that they will be able to access in your B-Productiv Portal.
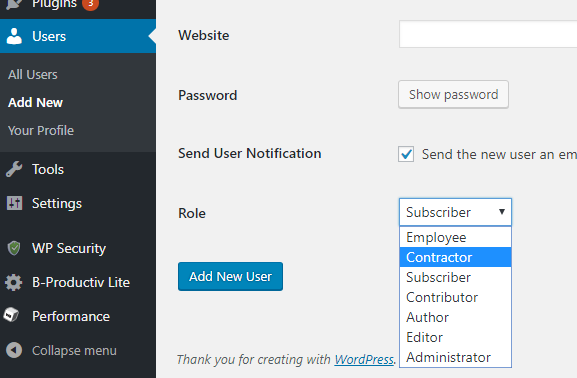
3. After you have chosen the ROLE of your User, make sure that SEND THE NEW USER AN EMAIL is checked. This will email your User at the email address that you entered, give them the Username that you created, and prompt them to change their password to one of their choosing.

4. Click ADD NEW USER and you User will be added to your account. To edit any information about your User, click on ALL USERS. From here, you will be able to see all of your users and their roles.
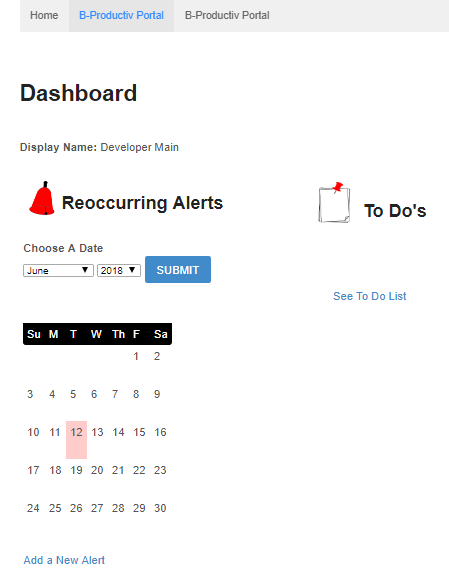
Adding New Reoccurring Alerts
Before adding a Reoccurring Alert, you must first determine who you want to set the alert for and make sure that individual has been added as a USER. Reoccurring alerts can be made for the employer (you) or the employee as a reminder to perform a certain task. Task can be set to repeat daily, weekly, bi-weekly, monthly, bi-monthly, Three times a year, Quarterly, Twice a year, annually, or not at all.
- Go to the Dashboard of the B-Productiv Plugin.
- Click on ADD A NEW ALERT.
- Enter the Notice that you want to assign. For example, “Please pay payroll taxes by the 15th of the month.”

- Assign this task to a User. Again, you can also assign alerts for yourself. If you do not see the User that you want to make and alert for, Go back to the WordPress Dashboard and make sure you see the individual under ALL USERS. Also, be sure that the individual is listed as an employee or the administrator (you). Reoccurring alerts cannot be set for Contractors, Subscribers, or Contributors.

- Choose the day that you want this alert to show on your calendar.
- Decide if this is an alert that you want to show up on your calendar on a regular basis. Choose YES or NO for REPEAT.
- Next, choose how often this Alert needs to be completed. You can only select NONE if you select NO under REPEAT. If you choose YES under REPEAT, then you must select a frequency.

- The Alert will only advance to the next date on the Calendar when you indicate that you have completed the current alert. For example, if your alert was , “Please pay payroll taxes by the 15th of the month” and you chose this to be a monthly alert, the alert will appear on the calendar for the next month, after you indicate that it was completed for this month.
 If there was an error in making this alert or if you no longer need a reminder about this activity, you can choose to DELETE the alert. Deleting the alert removes all instances of it from the Calendar.
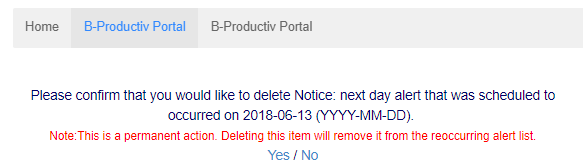
Adding New To Do’s
- Go to the Dashboard of the B-Productiv Plugin.
- Click on SEE TO DO LIST.
- Click on + to add an item to the list.

- Enter a detailed description of the task that you want completed.

- Choose the individual that you want to complete this task. You can assign this task to yourself, an employee, or a contractor. If you do not see the individual that you want to assign a task to, please make sure that the person is properly added as a User. If you want to assign a task to more than one User, you will have to repeat this procedure and choose the additional individual that you want to complete the task.

- Next select the priority level for this task. High priority tasks take precedence over lower tasks and should be completed that day, or ASAP. Normal priority tasks should be done within a week, and low priority task should be done after all High and Normal tasks are completed.
Deleting B-Productiv Lite
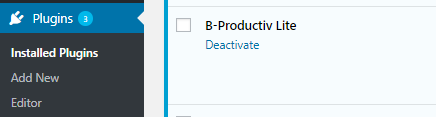
- To delete the B-Productiv Plugin, enter your WordPress backend, and click on the Plugins tab in the Navigation pane.
- Find the B-Productiv Plugin in your list of plugins, and click DEACTIVATE.
- After you have Deactivated the plugin, click DELETE.

- Select OK to to remove the plugin and all of its files and folders.
